Autocad Add Sheets to Drawing
Professional Tips and Techniques Using the Sheet Set Manager in AutoCAD
By Sam Lucido for Autodesk University

Following from Managing Your Sheets with the Sheet Set Manager, this article will take your skills further and expand your knowledge with professional tips and techniques for the AutoCAD Sheet Set Manager, including a deep dive into the commands, settings, and components that will help you increase your productivity. It will help you understand the power behind the tools included in the Sheet Set Manager so you can take your designs to the next level by connecting data and staying on top of current industry practices. We'll work through separate lessons (exercises) for you to use the data set and practice. Within each lesson there will be tips which will be highlighted for you to pay attention to as you go.
Introduction
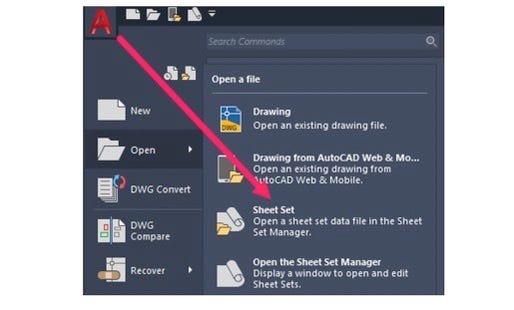
The Sheet Set Manager can be found on the ribbon under the application menu as shown in in the images below. You have the option of creating a new sheet set or opening an existing sheet set from this menu. If you use the menu bar TIP 1: (MENUBAR system variable set to 1) you can find it under the file section pull-down menu. TIP 2: For those of you who use the command prompt type SSM, after you successfully create a sheet set you can view your sheet set through the SSM Palette shown below on the right (i.e., Autodesk University).

Mastering AutoCAD Sheet Sets E-book
Mastering AutoCAD Sheet Sets was released as a free e-book from Autodesk in 2017. Download this reference to becoming an expert while using the full functionality of Sheet Sets.
Whether you design manufactured parts, maps, or buildings, the sheet set functionality in AutoCAD enables you to efficiently create, manage, and share your entire set of sheets from one convenient location. At first glance, the powerful functionality offered by the Sheet Set Manager may seem overwhelming, but the good news is you don't have to learn and implement all the functionality simultaneously.
TIP #3: We have developed this free e-book so you can immediately begin reaping the benefits of sheet set functionality. The e-book is structured to be self-paced, allowing you to progress through each level of implementation from the simplest to the most complex at your own speed. Spend just a few minutes each week or at your own pace until you've created a fully functional sheet set with minimum disruption to your current workflow. The e-book is conveniently organized into 17 chapters with step-by-step instructions on how to create a new sheet set, how to transition to sheet set master, and how to implement sheet sets for maximum efficiency.
Sheet Set Resources and More
TIP #4: In addition to the Expert Guide from Autodesk, you will find many resources on the Sheet Set Manager at Autodesk University. While each class may be different, they all contain excellent information on the Sheet Set Manager and tricks on how the author uses it efficiently within their design role. Please follow the links below to view sheet set classes as well as some of my favorite AutoCAD classes at Autodesk University.
A Complete Guide to the Sheet Set Manager in AutoCAD
Managing Your Sheets with the Sheet Set Manager: An Advanced Guide
6 Sheet Set Manager Strategies for Success
There's More to the Sheet Set Manager Than the Sheet
Advanced Topics Using the Sheet Set Manager in AutoCAD
Step out of the Past and into the Future with Sheet Set Manager
AutoCAD Sheet Sets: Custom Solutions to Improve Sheet Set Manager Productivity
Getting Productive with Plan and Production Tools in Civil 3D
Mighty Macros: Powerful Commands to Pump Up Productivity
3D Modeling with the Best: AutoCAD
Don't Be a Block Head — Make It a Dynamic Experience
AutoCAD Tips, Tricks, and Dazzling Drafting Techniques
Understanding the New AutoCAD — One AutoCAD with Seven Toolsets
AutoCAD Customization Boot Camp: Basic (No Experience Required)
AutoCAD Customization Boot Camp: Automate Workflows and Tasks
Programming the Work Out of CAD Management
Lesson 1: Example Sheet Sets and Creating New Sheet Sets per Discipline
TIP #5: Autodesk provides us with six example sheet sets (three Imperial and three Metric) to use as a guide and investigate the techniques used in creating an Architectural, Civil, and Mechanical Sheet Set.

1. Start AutoCAD and use the SSM palette shown left (Ctrl+4) to open and browse through the three example sheet sets provided in the Example Sheet Sets folder.
2. Under each folder is an Example Sheet Set.
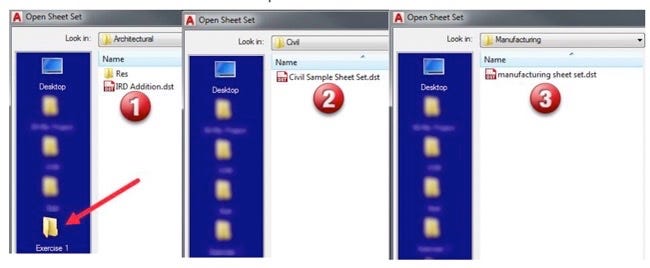
3. Open Each Sheet Set one at a time and look at all the properties of the SSM.
4. Use these as a guide and reference as you build your own sheet sets.
5. Close all your open sheet sets or close AutoCAD and restart.
This section is for review only. When you look at the samples and work others provide, you can gather tips and tricks on how you can use a technique to better help set up your projects.
Starting New Sheet Sets and Saving for Different Disciplines
1. Start AutoCAD and create a new Sheet Set using the SSM palette (Ctrl+4).
2. Select an Example Sheet Set.

3. Select Civil Imperial Sheet Set for this example. We are going to create one for each discipline within our company standards.

4. Name your Sheet Set file: AU_Civil_Project.
5. Give a description for the template you are creating.
6. Select the ellipse (…) and browse out to the folder where your (.dst) will be stored. We will move this to a template file location after we create the links with the title blocks.
7. Select the hierarchy button. This will bring in any subsets that are created by the example sheet set.
8. Browse to your folder and select OPEN select NEXT then FINISH.

9. You now have created a .dst file to start with within the Exercise 2 folder.
10. Close the SSM.
11. Do the same and create an AU_Manufacturing_Project using the manufacturing template.
12. Create a third one named AU_Arch_Project using the architectural template.
13. TIP #6: Create different subsets for each project by opening the sheet set and saving the file, mirroring what you would do on that type of work.
Lesson 2: Preparing Your Drawing Sheet Border
1. Start AutoCAD and open the Sheet Set in the Exercise 2 folder.
2. Notice the subsets have already been renamed to what is shown below.

3. Open drawing ANSID_DWG-Template.dwg located in the start folder as shown.
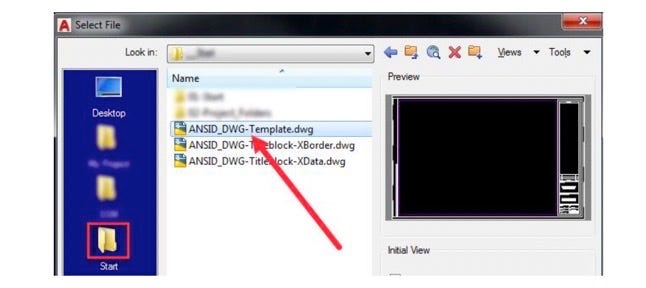
4. This drawing file is a standard 22 x 34 D size drawing with attributes added. We are going to take that drawing and use it to create our template for the project. TIP #7: This is where you would take your existing company title block and incorporate it into your sheet set setup.
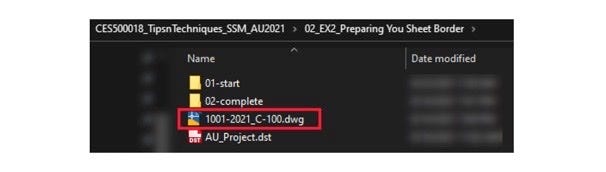
5. Save the drawing to your Exercise 2 folder and name the file 1001–2021_C-100. Notice how some project folders have already been created for you to save time.
6. Keep the drawing open and right-click on the C-100 layout tab.
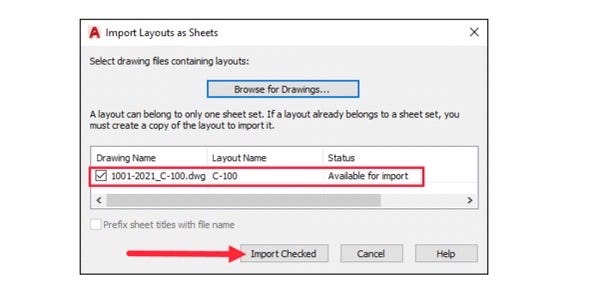
7. Select Import Layout as Sheet from the menu as shown.

8. Check the drawing name box and look to see there is no warning on the import. If there is a warning on import, the sheet may already be part of another sheet set and not available for import. In some instances, the sheet may have been attached to a previous sheet set and you will need to detach that if you have made a copy.
9. Your sheet will now appear in the layout as shown.

10. Right click the drawing and select Rename and Renumber. We do not have to do this, but we want to keep our drawing clean and consistent making sense as we go along.
11. Choose number 1.
12. Rename the Sheet Title to C-100.
13. Check the box to Rename the layout to match. This is important when using the file as a template.

14. Our drawing is now linked to the current sheet set.
15. Close the SSM and Close the drawing file.
Lesson 3: Adding Sheet Custom Properties
- Start AutoCAD and open the Sheet Set in the Exercise 3 folder.
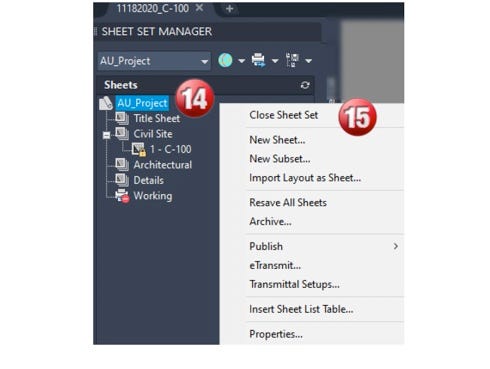
2. Double Click on 1-C-100 (1) to open the sheet set drawings. Right click (2) on the AU_Project and select Properties (3) on the fly out menu as shown.

3. Select Edit Custom Properties on the lower left of the dialog box.
4. Select the value.
5. Delete all default values provided within the sheet set.
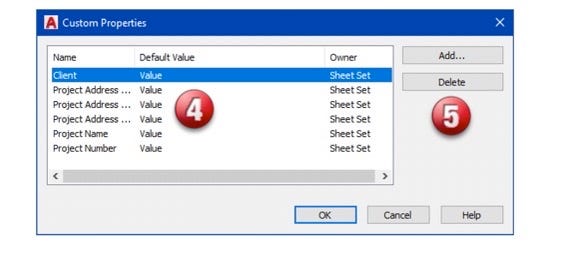
6. We are now left with sheet set properties that we will configure.
7. TIP #8: Add all the Project Control data. This will be common project data that can be used throughout the lifecycle of any project. These properties cannot be deleted or removed — only added.
8. Enter the values as shown. Note that you may enter your own values — we want to get something in there to visually see the field when it is updated.

9. Close out of the dialog box.
10. As in Step 2, right click the main sheet set and select Properties.
11. We will first edit Sheet Custom Properties.
12. Select Add.
13. Enter 01-Drawn by
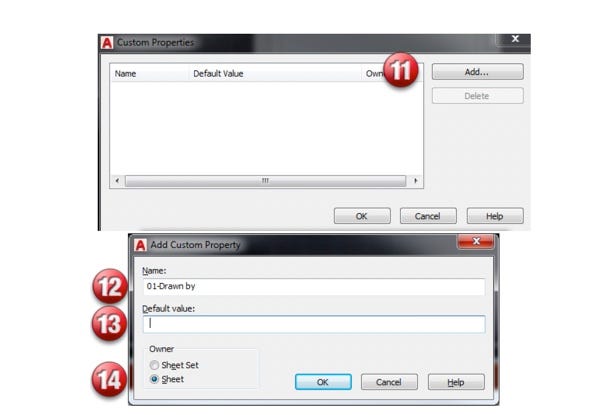
TIP #9: This is the area where you will see the word VALUE. You can use %% or %%U which will enable a blank field, but we are going to use a key combination or ALT+0160 (do not add the + sign) for a blank field. The key is to press and hold down the ALT key while you type 0160. The 0160 code will insert a nonbreaking space and appear blank when plotted as shown below.

Select Sheet. These will be sheet-only custom properties. Complete the same sequence and add another field named 02-Checked by.
TIP #10: Why numbers in front of the text? AutoCAD will sort the sheet set information numerically and alphabetically; therefore, to have things in order of the title sheet (i.e., drawn by then checked by) would be a more practical approach. Your sheet set will now have Sheet Custom Properties as shown.
Want more? Download the full class handout to read on.
Sam is a design systems administrator with CHA Consultants, Inc. Sam has over 25 years of experience in CAD drafting and design, CAD standards, CAD customization, including training and customization of Autodesk software. He presents learning sessions and workshops on CAD productivity to managers and users while providing support on architectural, civil, mechanical, and structural design projects. Sam is the owner and operator of CADproTips.com, an Autodesk Expert Elite Member and certified in AutoCAD and Civil 3D.
schipperslout1983.blogspot.com
Source: https://medium.com/autodesk-university/professional-tips-and-techniques-using-the-sheet-set-manager-in-autocad-51896a5d0838?source=rss-2110973a9ad8------2
0 Response to "Autocad Add Sheets to Drawing"
Post a Comment